: Introduction to Physical Assessment
6-1. INTRODUCTION
An accurate physical assessment requires an organized and systematic approach using the techniques of inspection, palpation, percussion, and auscultation. It also requires a trusting relationship and rapport between the nurse and the patient to decrease the stress the patient may have from being physically exposed and vulnerable. The patient will be much more relaxed and cooperative if you explain what will be done and the reason for doing it. While the findings of a nursing assessment do sometimes contribute to the identification of a medical diagnosis, the unique focus of a nursing assessment is on the patient's responses to actual or potential problems.
6-2. FACTS ABOUT PHYSICAL ASSESSMENT
a. Physical assessment is an organized systemic process of collecting objective data based upon a health history and head-to-toe or general systems examination. A physical assessment should be adjusted to the patient, based on his needs. It can be a complete physical assessment, an assessment of a body system, or an assessment of a body part.
b. The physical assessment is the first step in the nursing process. It provides the foundation for the nursing care plan in which your observations play an integral part in the assessment, intervention, and evaluation phases.
c. The chances of overlooking important data are greatly reduced because the physical assessment is performed in an organized, systematic manner, instead of a random manner.
6-3. PURPOSES OF A PHYSICAL ASSESSMENT
a. A comprehensive patient assessment yields both subjective and objective findings. Subjective findings are obtained from the health history and body systems review. Objective findings are collected from the physical examination.
(1) Subjective data are apparent only to the person affected and can be described or verified only by that person. Pain, itching, and worrying are examples of subjective data.
(2) Objective data are detectable by an observer or can be tested by using an accepted standard. A blood pressure reading, discoloration of the skin, and seeing the patient in the act of crying are examples of objective data.
(3) Objective data are sometimes called signs, and subjective data are sometimes called symptoms.
(4) Data means more than signs or symptoms; it also includes demographics, or patient information that is not related to a disease process.
b. The purposes for a physical assessment are:
(1) To obtain baseline physical and mental data on the patient.
(2) To supplement, confirm, or question data obtained in the nursing history.
(3) To obtain data that will help the nurse establish nursing diagnoses and plan patient care.
(4) To evaluate the appropriateness of the nursing interventions in resolving the patient's identified pathophysiology problems.
6-4. CONSIDERATIONS IN PREPARING A PATIENT FOR A PHYSICAL ASSESSMENT
a. Establish a Positive Nurse/Patient Rapport. This relationship will decrease the stress the patient may have in anticipation of what is about to be done to him.
b. Explain the Purpose for the Physical Assessment. The purpose of the nursing assessment is to gather information about the patient's health so that you can plan individualized care for that patient. All other steps in the nursing process depend on the collection of relevant, descriptive data. The data must be factual, not interpretive.
c. Obtain an Informed, Verbal Consent for the Assessment. The chief source of data is usually the patient unless the patient is too ill, too young, or too confused to communicate clearly. Patients often appreciate detailed concern for their problems and may even enjoy the attention they receive.
d. Ensure Confidentiality of All Data. If possible, choose a private place where others cannot overhear or see the patient. Explain what information is needed and how it will be used. It is also important to convey where the data will be recorded and who will see it. In some situations, you should explain to the patient his rights to privileged communication with health care providers.
e. Provide Privacy From Unnecessary Exposure. Assure as much privacy as possible by using drapes appropriately and closing doors.
f. Communicate Special Instructions to the Patient. As you proceed with the examination, inform the patient of what you intend to do and how he can help, especially when you anticipate possible embarrassment or discomfort.
6-5. BASIC TECHNIQUES USED IN PERFORMING A PHYSICAL ASSESSMENT
a. Inspection. Visual examination of a person is called inspection. This is done in an orderly manner, focusing on one area of the body at a time.
b. Palpation. Examination by touch is called palpation (figure 6-1). The nurses feels for texture, size, consistency, and location of body parts.
c. Auscultation. Examination by listening for sounds produced within the body is called auscultation. The sounds most frequently listened for are those of the abdominal and thoracic viscera and the movement of blood in the cardiovascular system. Direct auscultation, using the ear only, is seldom done. Indirect auscultation is generally carried out with a stethoscope.
d. Percussion. Examination of the body by tapping it with the fingers is called percussion (figure 6-2). Percussion is a special assessment skill that the practical nurse is not required to perform. This technique is usually performed by a registered nurse (RN) or a physician.

6-6. AREAS OF GENERAL APPEARANCE AND BEHAVIORAL ASSESSMENT
a. Demographic Data. You begin the assessment by collecting personal information, which includes name, age, sex, marital status, race, and religion. This identifies the patient and provides important demographic data.
b. Body Build. Observe the patient's general appearance and health state in relation to his age and lifestyle. Determine the patient's height, weight, and vital signs at this time.
c. Posture and Gait. Observe whether the patient is erect or slouched, steady or unsteady. Posture can indicate mood. For example, a slumped position may reflect depression; too rigid and upright a position may indicate anxiety.
d. Hygiene and Grooming. Look for cleanliness of nails, hair, skin, and overall appearance. Usually, you can assess these gradually while observing other parts of the body for data. Observe the skin for color, texture, temperature, and lesions. Lesions warrant particular attention during assessment. Some primary skin lesions are:
(1) Nodule--a solid mass extending into the dermis.
(2) Tumor--a solid mass larger than a nodule.
(3) Cyst--an encapsulated fluid-filled mass in the dermis or subcutaneous layer.
(4) Wheal--a relatively reddened, flat, localized collection of fluid. An example is hives.
(5) Vesicle--circumscribed elevation containing serous fluid or blood. An example is chickenpox.
(6) Bulla-- large fluid-filled vesicle. An example is a second-degree burn.
(7) Pustule--a vesicle or bulla filled with pus. An example is acne.

e. Dress. Observe the patient's clothing in relation to age, climate, socioeconomic status, and culture. Notice whether the clothing is clean, properly buttoned, or zipped. The patient's dress may reflect the cold intolerance of hypothyroidism. Slippers or untied shoelaces suggest edema.
f. Body and Breath Odors. Malodorous body or breath may indicate pulmonary infections, uremia, or liver failure. A breath odor of acetone may be due to diabetes. Although odors give important clues, avoid the common mistake of assuming that alcohol on a patient's breath explains neurologic or mental status findings. Alcoholic breath does not necessarily mean alcoholism.
g. Attitude. The patient's attitude is reflected in his appearance, speech, and behavior. The patient may be aloof and unwilling to participate in the interview. He may verbalize anger or fear. Some patients have a "take care of me" attitude and expect nurses and other health care personnel to magically know everything about them. Such findings should be noted as part of your general impression.
h. Affect/Mood. Affect is the emotional state as it appears to others. Mood is the emotional state as described by the patient. Observe the patient's facial expression. No part of the body is as expressive as the face. Feelings of joy, sadness, fear, surprise, anger, and disgust are conveyed by facial expression. Facial expressions generally are not consciously controlled.
i. Speech. Assess the patient's speech for loudness, clarity, pace, and coherence. Observe the patient for poor articulation of words and language difficulty. Patients who are not fluent in English or have limited education are sometimes mistakenly labeled as "indifferent" or "noncommunicative."
6-7. COMPONENTS OF A PHYSICAL ASSESSMENT
a. Health History. During this assessment step, you interview the patient to obtain a history so that the nursing care plan may be patterned to meet the patient's individual needs. The history should clearly identify the patient's strengths and weaknesses, health risks such as hereditary and environmental factors, and potential and existing health problems. Both the seating arrangement and the distance from the patient are important in establishing a relaxed and comfortable environment for data collection. Chairs placed at right angles to each other about 3 feet apart facilitate an easy exchange of information. If the patient is in bed, be seated in a chair at a 45-degree angle to the bed. If possible, communicate with the patient at eye level. State your name and status and the purpose of the interview. During the introduction, assess the patient's comfort and ability to participate in the interview. Terminate the interview when you have obtained the data you need or the patient cannot provide more information. You need the following information in order to form the subjective database.
(1) Chief complaint. Record the chief complaint as a brief statement of whatever is troubling the patient and the duration of time the problem has existed. The chief complaint is the signs and symptoms causing the patient to seek medical attention. Generally, it is the answer to the question, "What brought you into the hospital (or clinic) today?" If a well person is seeking a routine physical, there is no actual chief complaint. Record his reason for the visit and the date of his last contact with a medical treatment facility.
(2) Past medical history. This provides background for understanding the patient as a whole and his present illness. It includes childhood illnesses, immunizations, allergies, hospitalizations and serious illnesses, accidents and injuries, medications, and habits.
(3) Family health history. This enhances your understanding of the environment in which the patient lives. Obtaining this information identifies genetic problems, communicable diseases, environmental problems, and interpersonal relationships. Specific inquiry should be made regarding the general state of health of parents, grandparents, siblings, spouse, and children. Record if the patient is adopted and has no access to his biological family's history.
b. Vital Signs. The patient's vital signs are part of the objective data that helps to better define the patient's condition and helps you in planning care. The following vital signs may be taken at the time the patient's height and weight are obtained.
(1) Blood pressure. Blood pressure may be taken in both arms. Record whether the patient was lying, sitting, or standing at the time the reading was obtained.
(2) Temperature. Record the temperature and whether it is an oral, axillary, or rectal temperature.
(3) Pulse. Peripheral pulses are graded on a scale of 0-4 by the following system.
(a) 0 = absent, without a pulse.
(b) +1 = diminished, barely palpable.
(c) +2 = average, slightly weak, but palpable.
(d) +3 = full and brisk, easily palpable.
(e) +4 = bounding pulse, sometimes visible.
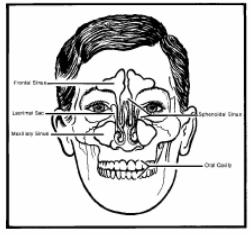
c. Head, Eyes, Ears, Nose, and Throat. Assessment of the head begins with a general inspection. Continue the assessment by examining the eyes, ears, nose, and throat. Knowledge of the anatomy of the skull (figure 6-3) is helpful in localizing and describing physical findings.
(1) Observe the general size of the head. Inspect the skull for shape and symmetry. Note any deformities. Become familiar with the irregularities in a normal skull, such as those near the suture lines between the parietal and occipital bones. Part the hair in several places and inspect the scalp for scaliness, lumps, or other lesions. Note the quantity, distribution, pattern of loss if any, and texture of the hair. Observe the patient's facial expression and contours for asymmetry, involuntary movements, edema, and masses. Note the color, pigmentation, texture, and any lesions of the skin.
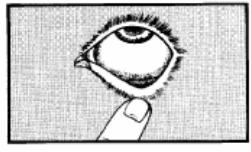
(2) Inspect the eyes for symmetry, movement, and the condition of the pupils, iris, and sclera. Ask the patient to look up as you depress both lower lids with your thumbs, exposing the sclera and palpebral conjunctiva (lining of inner surface of the eyelids). See figure 6-4. Note the color and vascular pattern against the white background of the sclera. An apparently yellow sclera indicates jaundice. Pale palpebral conjunctiva may indicate anemia. Look for nodules or swelling. The pupils and iris are assessed together. Examine the pupils for color, shape, equality, reaction to light, and accommodation. The pupils are normally black in color, round, and equal. If the pupil appears cloudy or discolored, the probable cause is a cataract. Health of the iris is determined by noting the regularity of the pupil. An irregular, constricted appearance to the pupil may result from edema due to inflammation of the iris. Screen visual acuity with any available print. If the patient cannot read the largest print, test the patient's ability to count your upraised fingers and distinguish light (such as your flashlight) from dark.

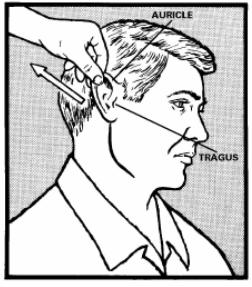
(3) The ear has three compartments: the external ear, the middle ear and the inner ear. Much of the middle ear and all of the inner ear are inaccessible to direct examination. The external ear is comprised of the auricle and ear canal. The ear canal opens behind the tragus. Assess the ears for hearing, symmetry, discharge, tinnitus (ringing in the ears), and vertigo (dizziness). Inspect each auricle of the ear and surrounding tissue for deformities, lumps, or skin lesions. If ear pain, discharge, or inflammation is present, move the auricle up and down, press the tragus, and press firmly just behind the ear. Movement of the auricle and tragus (figure 6-5) is painful in acute external otitis, but not in otitis media. Tenderness behind the ear may be present in otitis media. To estimate hearing, test one ear at a time. Ask the patient to occlude one ear with a finger. Stand 1 or 2 feet away, and whisper softly to the enucleated ear. Speak words with equally accented syllables, such as "homerun" or "four-nine." Make sure that the patient does not read your lips. Ask him to repeat what you have said.
(4) The nose has two major functions. It enables us to use our sense of smell and it is the air conditioner of the respiratory system. Assess the nose for bone alignment and epistaxis (nosebleeds). Inspect the nasal mucosa and septum. If the patient complains of nosebleeds, ask him about the frequency, amount, and color of the nosebleeds. Inspect and palpate the outside of the nose. By using a penlight or otoscope, you can get a partial view of each nasal vestibule. Note unusual skin markings, obvious deviation of the septum (asymmetry), discharge, or flaring of the nares. If the patient has a history of trauma to the nose, ask if there has been a change in his ability to smell. The nose, in conjunction with the paranasal sinuses, filters, warms, and moistens the air. The paranasal sinuses are air-filled cavities with ciliated mucous membrane linings. Only the frontal and maxillary sinuses are accessible to physical examination.

(5) Examine the throat. Include the lips, teeth, gums, tongue, buccal mucosa, uvula, and tonsils (figure 6-6). Observe the color and moisture of the lips. Note any cracking, lumps, or ulcers. Look into the patient's open mouth. Use a tongue blade and light to inspect the buccal mucosa for color, pigmentation, ulcers, white patches, and nodules. Patchy brown pigmentation is normal in black people. If the patient wears dentures, offer a container or paper towel and ask the patient to remove them so that you can look at the mucosa underneath. Look for swelling, bleeding, retraction, discoloration, and inflammation of the gums. Look for loose, missing, or carious teeth. Note abnormalities in the position or shape of the teeth. Inspect the back, sides, and undersurface of the tongue. Explain what you plan to do and put on gloves. Ask the patient to stick out his tongue. With one hand, grasp the tip of the tongue with a square of gauze and gently pull it to the side. Inspect the side of the tongue, and then palpate it with your other gloved hand, feeling for any hardening of tissue. Reverse the procedure for the other side of the tongue. With the patient's mouth still open, press the tongue blade down upon the midpoint of the arched tongue and inspect the uvula and tonsils. Note any evidence of pus, swelling, ulceration, or tonsillar enlargement. Whitish spots of normal tissue may sometimes be seen on the tonsils. White patches with redness and swelling, however, suggest pharyngitis. Break and discard the tongue blade after use. Inspect the neck, noting its symmetry and any masses or scars. Look for enlargement of the parotid or submaxillary glands, and note any visible lymph nodes.
NOTE: Determine the last medical check-up in each of these areas and the patient's need for corrective devices such as glasses, hearing aid, or braces.
d. Neurological Assessment. There are two approaches to assessment of the neurologic system, depending on the condition of the patient and his chief complaint. If the patient is undergoing a routine health assessment, a screening level exam is appropriate. If the patient's chief complaint relates to the neurologic system, a more detailed assessment is required. A most important consideration is the cooperation and participation of the patient. The following assessments should be made.
(1) Mental status. Assess the patients level of consciousness and orientation to time, place, and person. Much of the mental status exam can be done during the interview. The patient's orientation to person, place, and time are intact if he knows who he is, where he is, and the time of day. Altered states of consciousness are:
(a) Conscious--Alert, awake, aware of one's self and environment.
(b) Confusion--Disorientation in time. Irritability and/or drowsiness. Misjudgment of sensory input. Shortened attention span. Decrease in memory.
(c) Delirium--Disorientation, fear. Misperception of sensory stimuli. Visual and auditory hallucinations. Loss of contact with environment.
(d) Stupor--Unresponsive, but can be aroused back to a near normal state.
(e) Coma--Unresponsive to external stimuli.
(f) Akinetic mutism--Alert-appearing, immobile. Mental activity absent.
(g) Locked-syndrome--No effective verbal or motor communication. Consciousness may be intact. EEG indicates a preservation of cerebral activity.
(h) Chronic vegetative state - Vital functions preserved with no evidence of active mental processes. EEG indicates absence of cerebral activity.
(2) Pupillary reaction. Examine the pupils for briskness, symmetry, and accommodation. Pupils are normally round and can range in size from "pinpoint" to occupying the entire space of the iris. Pupils normally constrict with increasing light and accommodation (ability of the lens to adjust to objects at varying distances).
(3) Strength. Muscle strength is tested against the resistance of the examiner. Strength will vary from person to person. Symmetrical responses are significant and permit you to use the patient as his own control. Assess strength in all extremities, the neck, and back.
(a) To assess strength in the upper extremities, have the patient squeeze your first two fingers with both hands. The grip should be reasonably strong, but most important; it should be equal in both hands. Apply resistance when the patient flexes the wrist and elbow. Note any pain or weakness the patient has.
(b) To assess shoulder and scapulae resistance, ask the patient to extend both arms out in front of him and resist the push that you will apply. Try to push the patient's arms down. This is a common site for sports injuries, arthritis, and bursitis. Ask the patient to raise both arms above his shoulders. Try to push his arms down to his sides. Instruct the patient to resist your efforts.
(c) Assess the lower extremities in a similar manner with the patient lying down. Ask the patient to raise his leg against your hand, which is applying pressure on the thigh, trying to flatten the leg. Ask the patient to flex his knees so that his feet are flat on the table. Place your hands laterally at both knees. Note any pain with this movement.
(4) Sensation. The sensory functions include touch, pain, vibration, position, temperature, and discrimination. If the patient complains of numbness, peculiar sensations, or paralysis, sensation should be checked more carefully over flexor and extensor surfaces of the extremities. Generally the face, arms, legs, hands, and feet are tested for touch and pain.
(a) Touch is tested with a wisp of cotton. Ask the patient to close his eyes and respond whenever the cotton touches his skin. Compare the sensation in symmetrical areas of the body, such as the cheeks.
(b) Test the sharpness or dullness of pain by using the pointed and the blunt end of a safety pin. Ask the patient to close his eyes and identify which end of the pin is touching him. Compare distal and proximal areas and note any areas of reduced or heightened sensations.
(c) The sense of vibration is tested with a tuning fork held firmly against a bone. Bones commonly used are located at the thumb side of the wrist, the outside of the elbow, either side of the ankle, and the knee. Test the distal bones of an extremity first. Strike the tuning fork fairly hard and hold it against the patient's skin. The patient should feel the vibration or buzz.
(d) The middle finger and large toe are used to test the sense of position. Ask the patient to close his eyes. While supporting the patient's arm with one hand, grasp the patient's middle finger firmly between the thumb and index finger of your other hand. Exert the same pressure on both sides of the patient's finger while moving it. To test the sense of position using the large toe, place the patient's heels on the examining table and grasp the toe in the same manner. Use a series of brisk up, down, and straight out movements before coming to rest in one of the three positions. Ask the patient to identify the position.
(e) Temperature sensation is determined by touching the patient's skin with tubes filled with hot and cold water. Ask the patient to identify which tube feels hot and which feels cold. This test is unnecessary if the "sensation of pain" test is normal.
(f) The ability to discriminate can be tested several ways. One way is stereognosis (the ability to recognize objects by touching them). Place small, familiar objects such as a coin, paper clip, or key in the patient's hand and ask him to identify it. Another way is the one- and two-point stimuli. Alternate touching the patient's fingertip with two pinpoints simultaneously and then with one pin. Have the patient discriminate between the one- and two-point stimuli.
e. Respiration. Respiration is assessed using inspection, palpation, and auscultation. Have the patient remove all clothing to the waist and assume a sitting position. Inspect the chest for posture, shape, and symmetry of expansion. Warm the diaphragm of the stethoscope in the palms of your hands and place it firmly against the patient's chest wall. Ask the patient to breath quietly with the mouth open.
(1) There are three types of normal breath sounds: vesicular, bronchial, and bronchovesicular. Vesicular sounds are soft, like a quiet rustle or swish. Bronchial sounds are loud, harsh, hollow blowing sounds usually heard over the trachea and major bronchi. Bronchial sounds are louder during expiration. Bronchovesicular sounds are a combination of the other two and are heard in the upper anterior chest on each side of the sternum and posteriorly between the scapulae. Deep breathing converts vesicular sounds into bronchovesicular sounds.
(2) Assess the respirations for rhythm. Note whether the patient's breathing is regular, irregular, labored, or non-labored.
(3) Respiratory rate is the number of breaths in one minute. Bradypnea is less than 10 breaths per minute. Dyspnea is difficult or painful breathing. Orthopnea is difficult breathing except in an upright position.
(4) Lung sounds include breath sounds, voice sounds, and abnormal sounds. Assess lung sounds by auscultation, using a stethoscope. Auscultate the anterior and posterior upper, middle and lower lobes. Rales are crackling, tinkling sounds that occur when fluid or secretions are trapped in the smaller bronchioles or alveoli. Rhonchi are the rumbling, rattling, or snoring sounds due to mucous and secretions in the bronchial tree. A wheeze is the raspy whistling or high-pitched sound that occurs as air moves through a constricted or obstructed passage in the upper airway or bronchioles.
(5) Note whether the patient has a cough and whether it is persistent, occasional, productive or nonproductive. If the cough is productive, note the amount and character of the secretions.
Taking a Blood Pressure
Feel for the pulse of the brachial artery.
Align the "Artery" lable on the cuff with the pulse you felt.
Make sure the "Index Line" is within the normal range.
Close the valve and pump up the cuff. Slowly release the pressure.
Watch a video showing how to take a blood pressure.
f. Cardiovascular Assessment. Palpation and auscultation are used in assessment of the cardiovascular system, which includes blood pressure, peripheral pulses, heart sounds, and circulatory perfusion. The patient's blood pressure is usually taken at the onset of the assessment and the pulses are palpated while the skin is being examined.
(1) To obtain an accurate blood pressure reading, you will need a stethoscope, a blood pressure cuff, and a sphygmomanometer. Be sure that the patient is relaxed and use a cuff that is not more than 20 percent wider than the diameter of the patient's limb and long enough to completely encircle it. If the patient is very obese, it may be necessary to use a thigh cuff on his arm. If possible, take the blood pressure in two positions, supine or seated and standing. Wrap the cuff around the arm so that it is about one inch above the bend of the elbow. Palpate the brachial artery and place the diaphragm of the stethoscope over the artery below, but not underneath, the cuff. Inflate the cuff 30 to 40ºmmºHg above the point at which the last sound is heard. Release the pressure slowly. Observe the pressure readings on the manometer and relate these to the sounds heard through the stethoscope. The systolic pressure is the point where the first tapping sound is heard. The diastolic pressure is the point where the sound disappears.
(2) Take the peripheral pulses with the patient in the supine position, using your index and middle finger. Palpate the apical, radial, dorsalis pedis, and posterior tibial pulses. The posterior tibial pulse is palpable behind and below the protuberance on the inside of the ankle. See figure 4-2 for arterial pulse sites.
(3) Several heart sounds can be heard by auscultation (see figure 6-7). The first two heart sounds are produced by closure of the valves of the heart. The first heart sound (S1) occurs when the ventricles have been sufficiently filled and the right and left atrioventricular (A-V) valves close. S1 is heard as one dull, low-pitched sound. After the ventricles empty their blood into the aorta and pulmonary arteries, the semilunar valves close, producing the second heart sound (S2). The second heart sound is shorter and has a higher pitch than S1. The two sounds occur within one second or less, depending on the heart rate. Systole is the period in which the ventricles are contracted. It begins with the first heart sound and ends at the second heart sound. Diastole is the period in which the ventricles are relaxed. Normally no sounds are heard during this period. The two heart sounds are audible anywhere in the region over the heart, but are best heard over specific valve areas. Rhythm is the pattern of the heartbeats and the intervals between the beats. It may be regular or irregular. Normally, equal time elapses between heartbeats. Any deviation from the normal pattern is arrhythmia. Murmurs, produced by turbulent blood flow, may occur at any cardiac auscultation site. The volume of blood flow, the force of the contraction, and the degree of valve compromise all contribute to murmur quality. Descriptive terms are used to give the murmur character. Murmurs are "whooshing" sounds. Although the mitral sound is usually loudest, a stenotic mitral valve that moves very little may produce a muffled sound.
Transmission of sounds with the closure of the heart valves.
A = Aortic
P = Pulmonic
T = Tricuspid
M = Mitral
Figure 6-7. Areas to auscultate for heart sounds.
(4) Circulatory perfusion is blood flow through the vessels of a specific organ or tissue. Arteries carry blood away from the heart, the capillaries serve as in-between channels, and the veins carry blood toward the heart. Close examination of the extremities will indicate the quality of the arterial and venous systems. Capillaries are the smallest blood vessels. It is through their walls that oxygen and food are supplied to the individual cells. To test capillary refill to extremities, press on a toe or fingertip, observe blanching and the time it takes the area to return to its original color. Document the time in seconds.
Figure 6-8. Abdominal regions.
g. Gastrointestinal Assessment. Inspection, palpation, and auscultation are used in gastrointestinal (GI) assessment. The GI system comprises two major components: the alimentary canal and the accessory organs. The alimentary canal includes the pharynx, esophagus, stomach, small intestine, and large intestine. Accessory organs aiding GI function include the salivary glands, liver, gallbladder and bile ducts, and the pancreas. Assessment of the gastrointestinal system includes inspection of the oral cavity (during HEENT evaluation), auscultation and palpation of the abdomen, and examination of the rectum.
(1) To ensure accurate abdominal assessment and consistent documentation of your findings, mentally divide the patient's abdomen into four quadrants (figure 6-8). Begin by inspecting the patient's entire abdomen, noting overall contour (flat, round, concave, protruding), skin integrity, appearance of the umbilicus, and any visible pulsations. Note any localized distention or irregular contours, rashes, dilated veins, and scars.
(2) After inspecting the patient's abdomen, use a stethoscope to auscultate for bowel and vascular sounds. Lightly press the stethoscope diaphragm on the abdominal skin in all four quadrants. The bowel may be active, hyperactive, or hypoactive. Normally, air and fluid moving through the bowel by peristalsis create soft, bubbling sounds, mixed with clicks and gurgles, every 5 to 20 seconds. Loud, gurgling irregular sounds heard about every three seconds are hyperactive and may occur normally in a hungry person. Following, or when the colon is filled with feces, hypoactive bowel sounds may occur at a rate of one every minute or longer. Abdominal auscultation should be performed before percussion and palpation, because intestinal activity and bowel sounds may be altered by the motion of percussion and palpation.
(3) Palpation elicits useful clues about the character of the abdominal wall; the size, condition, and consistency of abdominal organs; the presence and nature of abdominal masses; and the presence, degree, and location of any abdominal pain. Gently press your fingertips about ½ inch into the abdominal wall. Move your hands in a slightly circular fashion so that the abdominal wall moves over the underlying structures. Note the character of the abdomen (soft, rigid, firm, tender, or nontender). Assess for organ location, masses, and areas of tenderness or increased muscle resistance. If you detect a mass, note its location, size, shape, degree of tenderness and mobility, and the presence of pulsations. When assessing a patient with abdominal pain, always auscultate and palpate in the painful quadrant last, touching the painful area may cause the patient to tense the abdominal muscles, making further assessment difficult.
NOTE: Do not palpate a pulsating midline mass; it may be a dissecting aneurysm, which can rupture under the pressure of palpation. Report the mass to a doctor.
(4) Gather information about the patient's appetite during the interview. Ask the patient if he has lost weight.
(5) Gather information about the patient's elimination patterns and the character of his stools. Ask the patient when he had his last bowel movement and if he has nausea, vomiting, diarrhea, or constipation.
(6) A routine rectal examination is performed if the patient is over age 40, if the patient has a history of bowel elimination changes or anal discomfort, and for an adult male with a urinary problem.
(7) If the patient is ambulatory, ask him to stand and bend his body forward over the examination table. If the patient is unable to stand, place him in a left lateral Sims' position with the knees drawn up and the buttocks near the edge of the bed or examination table.
(8) Put on a glove and spread the patient's buttocks to expose the anus and surrounding area. Asks the patient to strain as though defecating. Inspect for inflammation, discharge, lesions, scars, rectal prolapse, skin tags, and external hemorrhoids. Apply lubricant to your index finger. Explain to the patient that you will insert your gloved, lubricated finger a short distance into the rectum. Have the patient breathe through the mouth and relax.
(9) Once you have inserted your finger, rotate it to palpate all aspects of the rectal wall for nodules, tenderness, and fecal impaction. The rectal wall should feel smooth and soft. In a male patient, assess the prostate gland when palpating the anterior rectal wall; the prostate should feel firm and smooth.
5-Minute Pelvic Exam Video
This 5-minute video demonstrates how to perform a gynecologic pelvic exam, including inspection of the vulva, insertion of a vaginal speculum, obtaining specimens, and bimanual pelvic exam.
www.brooksidepress.orgh. Genitourinary Assessment. The male genitalia may be examined with the patient either standing or supine. However, the patient should stand as you check for hernias or varicoceles. Examine the female genitalia with the patient in a dorsal recumbent position.
(1) When assessing the urinary system, check for and evaluate edema. Press firmly over a bony surface for 5 to 10 seconds, and then remove you finger. Note how long the depression remains. Document your observation on a scale from +1 (barely detectable) to +4 (a persistent pit as deep as 1 inch). When associated with fluid retention and electrolyte imbalance, edema may indicate renal dysfunction, such as nephritis.
(2) Palpate the bladder for distention and tenderness. Press deeply in the midline about 1 to 2 inches above the symphysis pubis. During deep palpation, the patient may feel the need to urinate; this is a normal response. Note the size and location of the bladder. Check for lumps and masses. The bladder normally feels firm and relatively smooth.
(3) Ask the patient about urinary patterns such as retention, urgency and frequency. Ask the patient if he has noticed blood in his urine or if he has pain when urinating. Ask the patient to urinate into a specimen cup. Assess the sample for color, odor, and clarity.
(4) Provide the patient with a gown. and drape appropriately. Be sure to wear gloves. Expose the genitalia and inguinal areas and proceed with the examination.
(5) Inspect the inguinal and femoral areas carefully for bulges. A bulge that appears on straining suggests a hernia.
(6) Look for nits or lice at the bases of the pubic hairs.
(7) Have the male patient assume a supine position. Begin assessment of the male genital system by inspecting the penis. Look for ulcers, scars, nodules, or signs of inflammation. Compress the glans gently between your index finger and thumb to open the urethral meatus and inspect it for discharge.
(8) Inspect the scrotum. Note any swelling, lumps, or veins. Palpate each testis and epididymis. Note their size, shape, consistency, and tenderness.
(9) During the examination, the male patient may have an erection and probably be embarrassed about it. Explain to him that this is a normal response, and finish your examination in an unruffled manner.
Watch a video demonstrating a pelvic exam
(16.3 MB)
(10) Ask the female patient to empty her bladder before you begin the examination. To assess the perineal area, position her in a dorsal recumbent position with her head and shoulders slightly elevated to relax the abdominal muscles and so that both you and the patient can see each other's face. Explain in advance what you are about to do.
(11) Assess the perineal area for character of skin and abnormal masses or discharge. Spread her labia with a gloved hand and inspect the urethral meatus; it should appear pink and free of swelling or discharge. In any patient, inflammation and discharge may signal urethral infection. Ulceration usually indicates a sexually transmitted disease.
i. Musculoskeletal Assessment. Musculoskeletal assessment begins the instant you see the patient. Good observation skills will enable you to gain information about muscle strength, obvious physical or functional deformities or abnormalities, and movement symmetry. If the patient's chief complaint involves a different body system, the musculoskeletal assessment should represent only a small part of the overall assessment. If the health history or physical findings suggest musculoskeletal involvement, analyze the patient's complaints and perform a complete musculoskeletal assessment.
(1) Observe the patient's general appearance, body symmetry, gait, posture, and coordination. Inspect and palpate his muscles, joints, and bones. Evaluate muscle and joint function of each body area as you proceed with the examination. Compare both sides of the body for size, strength, movement, and complaints of pain.
(2) Position the patient to allow full range of motion (ROM), but avoid tiring the patient by allowing him to sit whenever possible.
(3) Inspect spinal curvature. Have the patient stand as straight as possible and inspect the spine for alignment and the shoulders, iliac crests, and scapulae for symmetry of position and height. Normally, the thoracic spine is characterized by convex curvature and the lumbar spine is characterized by concave curvature in a standing patient. Have the patient bend forward from the waist with arms relaxed and dangling. Stand behind him and inspect the straightness of the spine, noting flank and thorax position and symmetry.
(4) Have the patient stand with his feet together. Note the relation of one knee to the other. The knees should be symmetrical and located at the same height in a forward-facing position.
(5) Ask the patient to walk away, turn around, and walk back. If the patient is elderly or infirmed, remain close and ready to help if he should stumble or start to fall. Observe and evaluate his posture, pace and length of stride, foot position, coordination, and balance. Normal findings include smooth, coordinated movements, erect posture, and 2 to 4 inches between the feet. Abnormal findings include a wide support base, arms held out to the side or in front, jerky or shuffling motions, toeing in or out, and the ball of the foot, rather than the heel, striking the floor first.
(6) To assess gross motor skills, have the patient perform range-of-motion (ROM) exercises (see Nursing Fundamentals I, figure 5-1). To assess fine motor coordination, have the patient pick up a small object from a flat surface.
(7) Assess muscle tone. Muscle tone is the tension in the resting muscle. Palpate the muscle at rest and during passive ROM from the muscle attachment at the bone to the edge of the muscle. A relaxed muscle should feel soft and pliable. A contracted muscle should feel firm.
(8) Assess muscle mass. Muscle mass is the actual size of a muscle. Assessment involves measuring the circumference of the thigh, the calf, and the upper arm. Measure at the same location on each area. Abnormal findings include circumferential differences of more than ½ inch between opposite thighs, calves and upper arms, decreased muscle size (atrophy), excessive muscle size (hypertrophy) without a history of muscle building exercises, flaccidity (atony), weakness (hypotonicity), spasticity (hypertonicity), and involuntary twitching of muscle fibers (fasciculations).
(9) Assess muscle strength and joint ROM. Have the patient perform active ROM as you apply resistance. Normally, the patient can move joints a certain distance (measured in degrees) and can easily resist pressure applied against movement. Strength is normally symmetrical. If the patient cannot perform active ROM, put the joints through passive ROM. Use a goniometer (figure 6-9) to measure the angle achieved. Place the center or zero point on the patient's joint. Place the fixed arm perpendicular to the plane of motion. As the patient moves the joint, the movable arm indicates the angle in degrees.
Figure 6-9. Goniometer.
j. Assessment of the Integument. Physical assessment of the skin, hair, and nails requires inspection and palpation. Be sure the room is warm to prevent cold-induced vasoconstriction, which may affect skin color.
(1) Systematically, assess the entire skin surface as you expose each area for inspection and palpation of other systems. Observe the patient from a distance, noting complexion, general color, and overall appearance. A bluish discoloration is due to lack of oxygen in the blood. A yellow skin tone (jaundice) indicates liver dysfunction. Note pigmentation (light and dark areas compared to the rest of the skin), freckles, and moles.
(2) Assess skin texture, consistency, temperature, moisture, and turgor. Skin texture refers to smoothness or coarseness. Consistency refers to changes in skin thickness or firmness and relates more to changes associated with lesions. The skin should feel warm to cool, and areas should feel the same bilaterally. Assess turgor by gently grasping and pulling up a fold of skin, releasing it, and observing how quickly it returns to normal shape. Normal skin usually resumes its flat shape immediately. Poor turgor may indicate dehydration and connective tissue disorders.
(3) Note the quantity, texture, color, and distribution of hair. Rub a few strands of the patient's hair between you index finger and thumb. Feel for dryness, brittleness, oiliness, and thickness.
(4) Assessment of the nails provides information about the patient's life-style, self-esteem, and level of self-care as well as health status. Inspect the nails for cleanliness, length, color, consistency, smoothness, symmetry, and for jagged or bitten edges.
(5) Note any alterations in skin integrity such as scars, rashes, sores, lesions, bruises, and discoloration. If the patient has a dressing, note the type, location, any drainage, and the amount and character of the drainage.
6-8. GUIDELINES FOR DOCUMENTATION
a. The nursing history and assessment should be completed for each patient within 24 hours of admission. Documentation of the physical assessment should be done in an organized fashion according to systems. Information should be thorough and flow logically from one consideration to the next. Follow general charting rules using correct medical terminology, spelling, grammar, punctuation, and authorized abbreviations. Use the proper format and write neat and legibly. Depending on ward policy, the initial physical assessment is recorded on DA Form 3888, Medical Record - Nursing History and Assessment (see figure 6-10), DA Form 3888-1, and/or SF 510, Medical Record--Nursing Notes (see figure 6-11).
b. DA Form 3888 (see figure 6-10) documents a baseline nursing history and assessment on each patient. If completed at the time of admission, it may serve as the admission-nursing note. If DA Form 3888 is completed at admission, an admission note is not needed on SF 510. Make an entry on SF 510 to refer to the DA Form 3888 for the admission note. Data entered on this form represents baseline health status information used by the nurse to plan care. (See DA Form 3888 on the following pages.)
c. The nursing assessment is reviewed and revised as additional data are collected and patient needs change. Updated nursing assessment should be documented on the SF 510. Several methods and personnel may collect patient date from which a plan of care is developed. Regardless of what data is collected, and by whom, the professional nurse is ultimately responsible for the validity and reliability of the collected data.
6-9. CLOSING
As you learn the techniques of performing a comprehensive patient assessment, list these techniques in the order in which they are performed. Organize the assessment in a way that limits the number of times the patient must change positions, and the number of times you must change your own position. Once you have developed an organized and systematic approach and performed the assessment a number of times, you will be able to gather both subjective and objective information quickly and effectively. This approach will provide you with the information you need to develop your nursing diagnoses and care plans.